
Repotting orchids prevents their roots from getting overcrowded so they'll continue producing gorgeous blooms for years to come. Learn how to determine when an orchid is ready to repot and how to move it to a new container without damaging the roots.
1
Determine whether it's time to repot. The ideal time to repot an orchid is right after it finishes flowering, when it begins to produce new growth.[1] However, you don't need to repot your orchid every time this happens; rather it should be done no more frequently than every 18 - 24 months.
If you're not sure when your orchid was last repotted, and it seems to be growing out of its pot, yours may be overdue for a repotting. Take a look at your orchid for the following signs to know if it's ready to be repotted:
Several roots are growing over the pot. If you see many roots - not just one or two - dangling over the pot, your orchid needs more room, and it's time to move it to a bigger space.
Some of the roots are rotting. If they seem soggy, and the potting material is no longer draining properly, you'll need to repot the orchid.
The plant is growing over the edge of the pot. If the bulk of the plant is leaning way over the edge, it needs more space.
2
Don't repot orchids unless you really need to. Being overzealous with orchid repotting can throw off the plant's growing cycle. An orchid should only be repotted if the above symptoms are evident. If it looks to be healthy and well contained in its current pot, put off repotting for another year. It's better for the orchid to get a little overcrowded than to be repotted too soon.
3
Figure out what potting material you need. Now that you know it's time to repot your orchid, it's important to figure out the right type of potting material to use. Many orchids used as house plants are epiphytic, rather than terrestrial, meaning they don't grow in soil.
These types of orchids will die if you repot them in regular potting soil.
A combination of fir bark, sphagnum moss, charcoal and coconut husks is appropriate for many orchid genera. Most common orchids will do well with this mixture:

4 parts fir bark or coconut husks
1 part medium charcoal
1 part perlite
If you're not sure exactly what kind of orchid you have, packaged potting mix for orchids is a safe bet for most epiphytic orchids. It's available at many nurseries and home and garden centers.
If you have a terrestrial orchid, you'll need soil that is crumbly and retains water well. It should have a high content of perlite and wood matter.
Ask at your local nursery for the particular mix that's right for your orchid genus.
4
Decide what size pot to use. When repotting an orchid, you'll need a pot just an inch or so bigger than the pot the orchid originally came in. You want to provide a little more space, but not too much - otherwise, the orchid will concentrate its energy on growing roots, and you won't see flowering for many months. Look for a plastic, clay, glass or ceramic pot suitable for your orchid size.
Make sure the new pot has drainage holes. If it doesn't drain properly, the orchid roots will rot.
Some orchid species have roots that can photosynthesize. If you have a Phalaenopsis, consider getting a clear glass or plastic pot to let the sunlight in.
If you need to choose a pot that's on the larger side, you might want to add some broken terra cotta chips to the bottom of the pot. This will help the potting material in the middle of the pot, which tends to stay wet, drain more effectively.
1
Measure out the potting material you need into a large bucket or bowl. Fill your new orchid pot with the potting mix, then dump it into a container about twice its size. To prepare orchid potting mix, you'll need to soak it in water overnight. This will help it retain enough moisture to sustain the orchid
2
Cover the potting mix with hot water. Go ahead and fill the bucket or bowl to the top with hot water. Don't use cold water, since the potting materials won't absorb this as well. Be sure the soil is at room temperature before repotting the orchid.
3
Strain the potting mix. You can use a strainer that you'd normally use for food (you'll want to clean it well afterward) or a large piece of cheesecloth. Drain out all the water so that all you're left with is wet potting mix. Run more warm water over the mix to rinse out any dust.
4
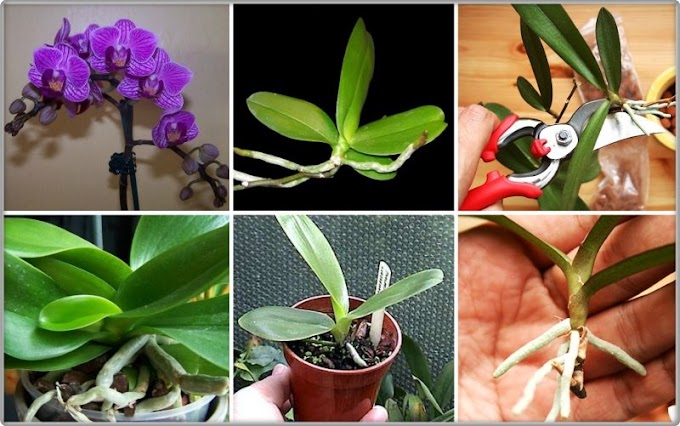
Remove the orchid from its old pot. Carefully lift the orchid from its old pot, loosening each root individually. If the roots are stuck to the pot, use sterilized scissors or knife to help free them. It's important to use very clean equipment, because orchids are prone to getting diseases.
You can sterilize your trimming tools by wiping them with rubbing alcohol on a rag.
5
Remove the old potting mix and dead roots. Use your fingers and a clean pair of scissors to carefully clean up the roots. Pick out the old mix - charcoal, wood chips, moss, and so on - and discard it. Use the scissors to clip away rotten or dead roots, taking care not to damage any healthy plant matter.
Roots that are soft and limp are probably dead, so go ahead and remove them.
Untangle the roots carefully by easing them apart with your fingers.
6
Get the new pot ready. If you're using a pot that you've used before for orchids, clean and sterilize it with boiling water to get rid of toxins and kill potential disease vectors. If the pot is large and deep, line it with broken pieces of terracotta or packing peanuts to help with drainage. If you're using a shallow pot, this step isn't necessary.
Repotting the Orchid
1
Place the orchid in its new pot. The older growth should go toward the bottom of the pot, with the newer growth toward the sides, where it will have more room to spread out. The top part of the root mass should be at the same level it was in the previous pot. That means the new shoot should be above the surface of the pot, with most of the roots below the surface.
2
Press the potting mix into the pot. Pour some in around the roots. Shake the pot and tap on the side of the pot to help the potting material settle lightly packed around the root coils. If you do use your fingers, press gently so that the live roots are not damaged. Make sure there are no big air pockets. If parts of the roots are left uncovered, they won't grow properly.
It helps to pour in just a little potting mix at a time. Work that around the roots with your fingers, then pour in more mix and keep going.
Continue pressing in the mix until it's level with the top of the pot.
3
Make sure the plant is able to stand upright when you're finished. Stake the plant upright or clip it to the side of the pot so it does not fall over or grow crookedly.
4
Continue caring for your orchid as before. Place your orchid in a temperate spot with partial shade. Water it sparingly or according to the needs of your particular orchid.

